All posts by Andy

Creating a Calderesque Mobile

calder

The sculptor Alexander Calder said “To most people who look at a mobile, it’s no more than a series of flat objects that move. To a few, though, it may be poetry.” Here are some instructions to make your own small version of this spatial poetry.

Before you start, collect as many ideas about existing mobiles as possible. Searching the internet for “Calder mobiles” is a good way to begin. Calder was an important modern artist who made this type of mobile popular. Several modern art museums exhibit some of his mobiles.
To make the mobiles more complex, you can vary the shape and size of the wood pieces, the side to which you attach one arm to the next, the curvature of the wire, and by hanging the mobile or allowing it to stand on its own.

Warnings
Exercise proper safety precautions when using workshop and power equipment.
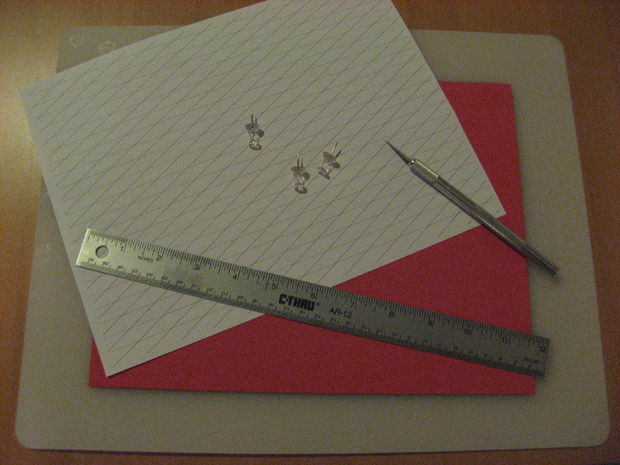
Things You’ll Need:

  • Needle-nose pliers
  • Wire (hardware stores sell 200ft rolls of galvanized wire)
  • Sheet of 1/2″ ply wood for the weights or shapes at the end of the wires
  • Drill and bit (same diameter as the wire)
  • Clamp to hold the wood pieces when drilling
  • Jig saw to cut out the wood pieces.

(I’ve originally posted this ‘how-to’ on wikiHow.)

Step 1: Mobile Weights

Cut out the wood pieces using a jig saw or chop saw. For a first mobile, it is good to start with simple square wood pieces measured 2″ x 3″. Cut out 9 pieces. For advanced mobiles, you can come up with all kinds of varied shapes.

Step 2: Mobile Weights

Clamp one piece at a time to the work bench and drill a 1″ hole into the edge.

Step 3: Mobile Tool

With the needle nose pliers, cut off a 15″ strand of wire and straighten it.

Step 4: Mobile Tool

Make a small U-shaped hook at the end.

Step 5: Mobile Tool

To train yourself in making loops in the wire, and to use as a template for the following wires, make loops in the wire strand every 1″, so that you end up with 12 loops. We’ll call this piece the mobile tool.

Step 6: Start with making the base of our hanging mobile

At the base there are two wood pieces balanced on a strand of wire. With the needle nose pliers, cut off another 15″ strand of wire and straighten it. Mark the wire at 7.5″ and using the pliers, make a loop or eye. Take two wood pieces and slide them onto the wire on opposite sides. Hook the loop into the hook of your mobile tool and make it balance. You can trim the balancing by shortening the wire if necessary.

Step 7: Make the first arm of the mobile.

Cut off a 12″ strand, straighten it, make a U-shaped hook and bend the hook sideways.

Step 8: Tipping Point

mobile 8Use the mobile tool to find the arm’s tipping point, and that’s where you’ll make the loop in the arm. Slide a wood piece on the end of the mobile tool, while you leave the base piece hanging off its hook. Then take the new arm wire and hook it into one of the loops of the tool. Find the loop that allows for best balancing.

Step 9: Hooks and Loops

mobile 9
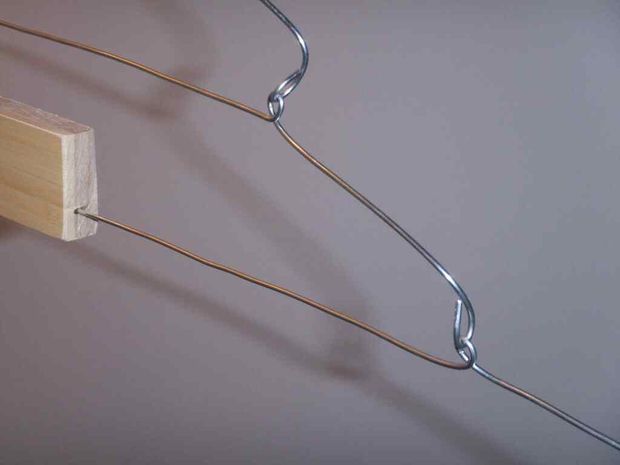
Unhook the arm from the tool and hold it next to the tool to determine where you have to make the loop in this arm. Make the loop, attach a wood piece to the arm and hook the arm into the base wire, then take the tool and hook it into the arm’s loop and check the balance. You can adjust it by shortening the wire, bending it down a bit or even reshaping the arm and placing the loop differently. Changing the weight of the wood piece is possible, too.

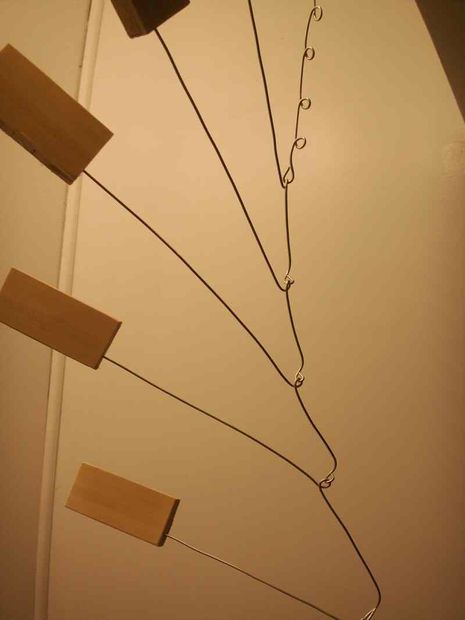
Step 10: Multiple Arms

Repeat the process for each arm. You can hook the arms all left-facing or mix the left- and right-facing arms.

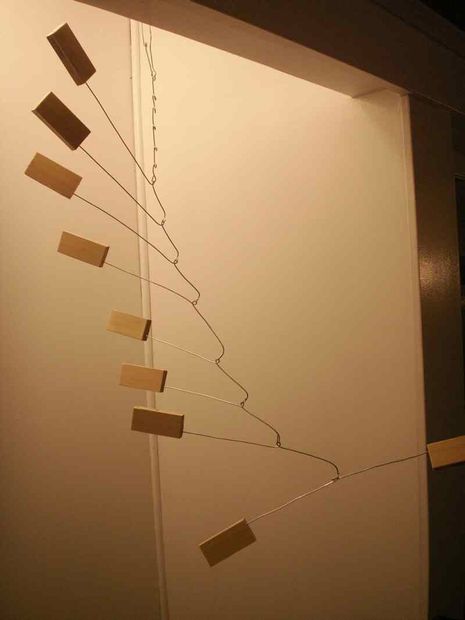
Step 11: Finished Mobile

String the loop of the last arm to a hook in the ceiling.

mobile finished

Fridge Magnet Mosaic

Colorful geometric mosaic pieces you can combine to cool Vasarely (www.lateral.hu/illusions/vasarely.html) like art pieces on your fridge.

Fridge magnets title

Here is what you need:
– 3 sheets (letter sized; 8.5 inches x 11inches) of magnetic foil, in the USA Michael’s sell them.
– 3 sheets of arts and crafts foam in different colors (cut to letter sized; 8.5 inches x 11 inches), in the USA Michael’s sell them
– Exacto Knife or Utility Knife with new blade
– Paper Glue Stick
– Metal Ruler
– Printer, Computer
– 10 Push Pins
– Large Metal Surface (i.e. refrigerator, metal whiteboard, car)

Fridge magnets red pattern

Step 1: Glue foam sheets to magnetic sheets

Glue foam sheets to magnetic sheets

Step 2: Cut away any overhanging foam sheet

Cut away any overhanging foam sheet

Step 3: Pattern

Download and print out paper pattern sheets (make sure not to skew prints by fitting to pageformats other then the original letter size)
Alternatively you can make your own patterns. I.e. squares, diamonds based on 15 degree increments, pentagons, etc.

C:\medium diamonds.PDF2 KB

C:\small diamonds.PDF2 KB

C:\big diamonds.PDF1 KB

Step 4: Transfer Pattern

Use 5 to 10 pushpins to affix the pattern sheet to the foam/magnetic sheet, by pushing the pins through the paper and underlying sheet on pattern intersections around the outer areas of the pattern.
Use another pin to make holes in every pattern intersection. This methods allows you to transfer the pattern without marking the foam and also helps with the cutting of each piece.
When you are done, remove the pattern sheet.

Step 5: Cut out the pieces

Align the ruler with the pin holes and cut foam and underlying sheet. Be careful not to cut the sheet all the way through to the edges of the sheet. This will help holding the sheet together, when making the intersecting cuts.
Make the intersecting cuts. Be certain to use a new, sharp knife blade and to hold the foam down with the ruler where you cut so that the knife does not rip through the foam.

Step 6: Break out pieces and repeat for other sheets/patterns

Break out the pieces.
Repeat for the two remaining sheets.

Step 7: Mosaics!

Make space on your fridge doors and create cool mosaics on your fridge with the pieces you made.
If you’d rather buy some magnetic mosaics, check out this [link http://answers.google.com/answers/threadview?id=404315]


Roasting a Suckling Pig

piglet roasting - Copy

A suckling pig is a piglet that was slaughtered before it was weaned of her mother’s milk. The meat is very tender and the piglet is pretty small, between 20 to 40 lbs. It’s the perfect size for the rotisserie grill that I built recently.

Ingredients:

–        1 Suckling Pig

–        2 Quarts of Sauerkraut

–        2 Apples

–        2 Large Onions

–        20 LB char coal bag

–        Twine

–        Un-coated wire

piglet in cooler - Copy

You can order piglets from your butcher; it will arrive in a plastic bag, usually not frozen, and ready to be barbecued.

Roasting a pig takes more preparation then flipping burgers on a grill. Overall the prep will take about 2h and the actual roasting another 4 – 5h, a good rule of thumb is 1h per 10lb of pig.

piglet getting washed - CopyWe start by threading the spit rod through the pig and then skewering it with the spit forks in front and back. Make sure the forks are sitting really firm in the meat and are attached well to the rod. To secure it further, attach a U-shaped pipe clamp in the middle of the spine and tighten it against the rod. The rod should not be rotating freely within the pig.

piglet getting stuffed, sewn - CopyRinse the pig off in your bathtub and transfer it to the kitchen table. I like to stuff it with two 1 quart glasses worth of Sauerkraut, a couple cored and chopped apples and a couple of peeled and chopped large onions. After stuffing the pig, use a small kitchen knife to make sewing holes in the pig’s belly skin. The skin is surprisingly tough. Just like a shoe, lace it up with twine or paracord all the way from it’s hind legs to the jaw. Depending of the size of the pig you can attach the legs with wire to the spit in front and back or, like I did under the belly is ok, too.

piglet ready for roasting - CopyThe rod needs to be mounted in the rotisserie, make sure the motor is connected well and the rod is balanced with counter weight.  Put Aluminum foil over the ears and toes, to prevent them from burning. Add a cooking thermometer in the rear cheek and see, if it turns well on the grill.

The coal should be lit in a bbq-chimney outside of the grill. If possible, set the chimney on a grate, i.e. in a fire pit and then transfer the coals after all have started burning. The coals should be laid underneath the pig in a circle, mostly towards the sides of the grill, so it’s mostly indirect heat, especially under the belly. Keep the grill closed and hang another thermometer in to monitor grill temperature. Grill should be at around 350F.

Put an aluminum pan right under the pig’s belly to catch the fat and juices, so they won’t run into the fire and cause flames, because that would char the meat. Open a beer, sit back and wait, occasionally keeping an eye on temperature and rotisserie mechanism and add coal as needed.

According to the FDA, here in the USA, pork should have an internal temperature of 160F before it can be considered fully cooked. We took it out after it reached 150F and were quite happy with the results.

Once the pig has reached temperature, turn off the motor, disconnect the rod from the grill and using oven mits, transfer it to the carving block. Use a large carving board or butcher block or both. You’ll need a cleaver, a sharp chef’s knife and a large bbq fork. Wait until you can touch the rod, and then remove all metal first. Open up the belly and scoop the sauerkraut out into a bowl and use it as a side dish. While using the fork to hold the pig, use the cleaver to sever the parts, i.e. head, shoulders, hind legs. Each one of these parts can then be carved with the chef knife into smaller pieces, i.e. ribs, tender loin, etc. Many pieces can be sliced to make manageable portions for the guests and nicely presented on a buffet on a large platter.

IMG_5234 - Copy

Homemade Granola

granola done - Copy

Granola is a great alternative to cereal, but it’s expensive by comparison. Fortunately it’s very easy to make yourself. Not only is it much cheaper, but also you get to control what goes in it and enjoy the smell of fresh baked granola. I like to eat granola clusters with whole milk yoghurt and fresh fruit.

This recipe is for two  sheet pan, enough for about a week.


Ingredients:

  • 6 cups rolled oats
  • 2 cup slivered almonds
  • 2 cup shredded cashews or walnut
  • 3/4 cup shredded sweet coconut
  • 2/3 cup dark brown sugar
  • 1/2 cup maple syrup
  • 1/2 cup vegetable oil
  • 1 1/2 teaspoon salt
  • 1 tablespoon Vanilla Essence

 Directions:

Preheat oven to 250 degrees F.

In a large kitchenaid mixer bowl, combine maple syrup, oil, brown sugar, vanilla and salt.

With the flat pike shaped mixer attachment going on low, slowly add in oats, nuts and coconut.

Pour onto 2 lightly oiled sheet pans. Cook for 1 hour and 15 minutes, flipping over once after about 40 min.

granola before baking - Copy

Remove from oven and let cool before filling up into cereal containers.

Try replacing 1 – 2 cups of nuts with flax seed, chia or shredded hemp seeds.

Enjoy!

Simple Pizza Recipe

pizza - Copy

This is a very fast and easy pizza recipe, I’ve done several times. It’ll take longer to go to the restaurant, and these pizzas taste just as good or better, plus it’s a lot of fun to make. Works really well in the Kitchenaid mixer with dough hook attachment. The recipe will make two sheet pans and a pie pan, enough to feed 5 – 7 people.


Ingredients:

  •  6 cups all-purpose flour
  •  1 ounce active dry yeast
  •  4 tablespoons vegetable oil
  •  2 teaspoon salt
  •  2 tablespoon white sugar
  •  2 cup warm water (110 degrees F/45 degrees C)


Directions:

Combine flour, salt, sugar, yeast, oil and warm water in large mixer bowl, attach hook and let mix on low until dough ball forms.

Flour work surface and flatten out dough with rolling pin. Dough is enough for two large sheet pans and a round pie pan.

Lightly coat pans with flour and spread out dough. Trim away dough hanging over rim of pan.

Top first with tomato sauce followed by shredded cheese or pesto and then cheese. Then add more toppings like mushrooms, leaf spinach and whatever you have in the fridge.

Bake at 375 degrees C (190 degrees C) for 20 to 25 minutes or until cheese is melted and dough is light brown. Depending on oven size you might want to start baking first pan while getting second pan ready and so on.

Pig Roaster Steel Barrel Rotissierie

A long time ago I took a canoeing trip through eastern Poland and on one of the campgrounds a few folks there were barbequeing a pig on a spit. Ever since I’ve been thinking about doing something like that. Recently a lot of instructables on the topic had sparked my interest and when my birthday came around I decided it’s time for a pig roast this year!

I’ve researched the topic and found lots of good information on the topic: Instructables, You Tube Videos, Blogs, Manufacturer’s web sites.

Buying a new pig roaster will cost you between $800 to $20,000, even renting one from a party rental place cost still $200 and it seemed like a fun project, just looking at all the videos.

So I went with the smaller simple design of a 55gal drum Rotisserie. I got the drum, a rusty old pillow bearing and the angle irons from a Scrapyard. Make sure to get a drum that previously contained food stuff, i.e. olive oil.

The rotisserie motor, spit and forks are from One Grill. I thought about using a scrap motor but they cost more than the new motor. The kid’s bicycle wheel is from the scrap pile at a bicycle store and assorted small parts and rust covering and heat resistant paint are from several hardware stores.

I had to drill many holes into the barrel and L beam. When drilling into steel, use a carbide bit with cutting oil and go very slow with the variable speed drill but use lots of pressure. If you go too fast, the drill bit will burn out quickly and you only get a few holes through.


Instructions on how to build a Rotisserie BBQ out of a 55 Gal. Drum

Rotisserie Grill

Parts:

  • 53” Stainless Steel Spit Rod with two attachable forks, counterweight, handle from One Grill
  • Rotisserie Motor 40LB rated
  • Small pulley wheel
  • Kid’s bicycle front wheel, axle removed
  • 1-1/2” Pipe clamp to attach pig to post
  • 55gal steel drum and
  • 2x 36” heavy L-Beams for Stand
  • 2x 50” and 1 x 40” thick L beams with holes for stands
  • 1x 2×4 x 33” stud for stand as cross brace
  • Char Coal cylinder
  • Alu pan for drippings

IMG_5236 - Copy

Step-By-Step Instructions:

  1. Mark up steel barrel in two halves and cut with reciprocating saw
  2. Grind cut edges with angle grinder to smooth out edges
  3. Cut a 3″ diameter hole intersecting with rim into each upper barrel side to accommodate spit rod and pillow bearing
  4. Cut L beam into 2 30″ pieces, the stands
  5. Drill 3 holes into each stand
  6. Attach perforated L Studs (50″) to stands, stands and studs having L pointing outside
  7. Attach perforated L Joist to both studs, ca. 20″ off ground, L pointing outside
  8. Cut 4 3/4″ pipe pieces, to be used as fillers between Studs and lower barrel half
  9. Drill 4 1/4″ holes in lower barrel half, two on each flat side, 2″ to right of center, 4″ and 8″ above lower rim
  10. Cut flap in bottom (6″ square cut out on three sides) for venting and to remove ash
  11. Mount lower barrel
  12. Lay upper barrel on lower barrel, mark holes for hinges, drill
  13. Mark holes for handle, drill and install
  14. Wash and
  15. paint barrel outside with a coat of rust firming primer
  16. after 12h paint barrel outside with a coat of heat resistant paint
  17. Install lower barrel half
  18. Install hinges, upper barrel
  19. Install Pillow Bearing on right side stud, just above lower barrel half
  20. Install two caster wheels on left side of stud, same height as bearing, touching each other
  21. Cut pipe to size, 38″, drill 1/4″ hole for rod, seat rod in bearing, rest pipe on castersRotisserie Mechanics Sideview - Copy
  22. Remove Axle and Tire from wheel
  23. Hold rod over hub and mark edges, then Cut six small notches into Wheel hub inner edge to fit 1/2″ hex spit rod
  24. Attach Motor with pulley wheel below barrel on left stud, connect with bicycle wheel using beltSteel Drum Rotisserie Mechanics Top view - Copy
  25. Bake heat resistant paint according to manufacturer’s instructions (also burn off any residue inside barrel)

IMG_5230 - Copy